


3 mins read//
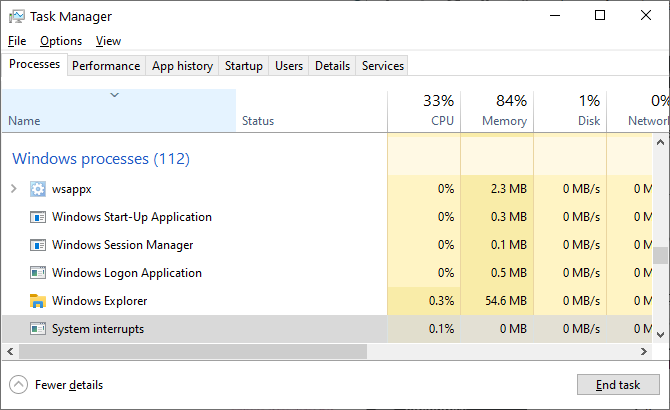
When you find that a process called "system interrupts" is causing high CPU usage, you are most likely dealing with a hardware or driver issue.
In this post, we explain what system interrupts are and how you can find and fix the underlying cause of their high CPU usage.
What Is "System Interrupts"?
System interrupts appears as a Windows process in your Task Manager, but it's not really a process. Rather, it's a kind of representative that reports the CPU usage of all interrupts that happen on a lower system level.
Interrupts can originate from software or hardware, including the processor itself.
When the interrupt handler task is completed, the processor resumes the state at which it was interrupted.
Interrupts are a form of communication of software and hardware with the CPU. For example, when you start typing on your keyboard, the respective hardware and software send interrupts to the CPU to trigger the processing of your input.
Interrupts can also tell the CPU that an error occurred and this can cause a spike in the CPU usage of system interrupts. On a healthy system, system interrupts will hover between 0.1% and 2% of CPU usage, depending on the CPU frequency, running software, and attached hardware.
Even peaks of 3% to 7% can be considered within the normal range, depending on your system setup.
How to Fix System Interrupts Causing High CPU Usage
If the system interrupts constantly hogs more than 5% to 10% of your CPU, something is wrong and you're most likely dealing with a hardware issue. We'll help you get to the bottom of this.
The first fix you should always try is to reboot your computer. If that doesn't help, start here:
1. Unplug or Disable All External Devices
USB hardware is a common culprit. You can either unplug your external USB devices or---while you're in the Device Manager (see below)---disable USB Root Hubs, i.e. blocking external hardware from interrupting the CPU.
In the Device Manager, find the entry Universal Serial Bus controllers and disable any USB Root Hub entry you can find.
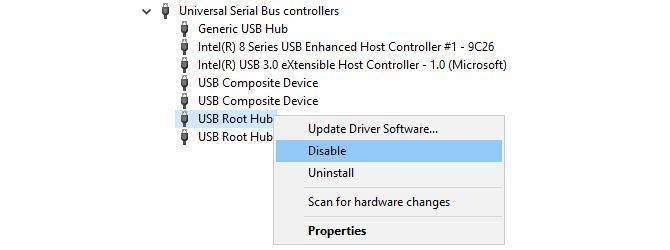
Note: If you're using an external keyboard or a USB (Bluetooth) mouse, they might stop functioning. Be sure to have an alternative method of re-enabling the device.
Tip for desktop computers: Check whether you have any unused SATA cables plugged into your motherboard and remove them.
2. Check Hardware Drivers
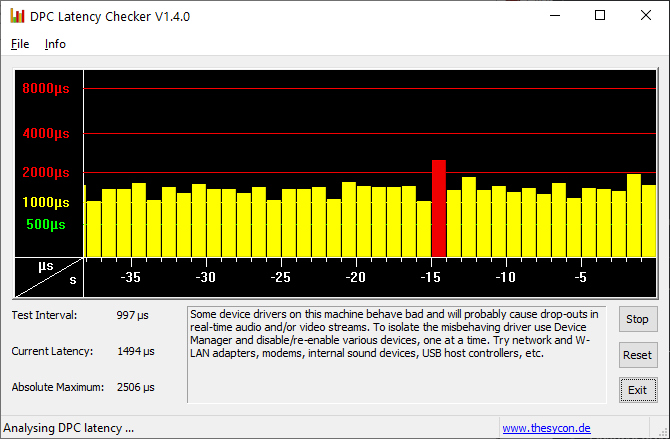
To quickly check whether you're dealing with a driver issue, you can run the DPC Latency Checker. Deferred Procedure Call (DPC) is a process related to system interrupts. When the interrupt handler needs to defer a lower priority task until later, it calls on the DPC.
DPC Latency Checker was designed to analyze whether your system can properly handle real-time audio or video streaming by checking the latency of kernel-mode device drivers. It's a quick way to reveal issues and the tool requires no installation.
If you see red bars, i.e. drop-outs due to high latency, something is off.
You can either try to find the culprit or—if the problem first occurred recently—roll back recent driver updates (Windows 10) or update your drivers with standard versions. Drivers that caused issues in the past were AMD SATA, HD audio devices, and missing Bluetooth drivers.
Alternatively, you can install and run LatencyMon, a latency monitor, to find the driver files with the highest DPC count. Press the Start / Play button, then switch to the Drivers tab, and sort the driver files by DPC count. Note that the count accumulates over time, so let it run for some time.
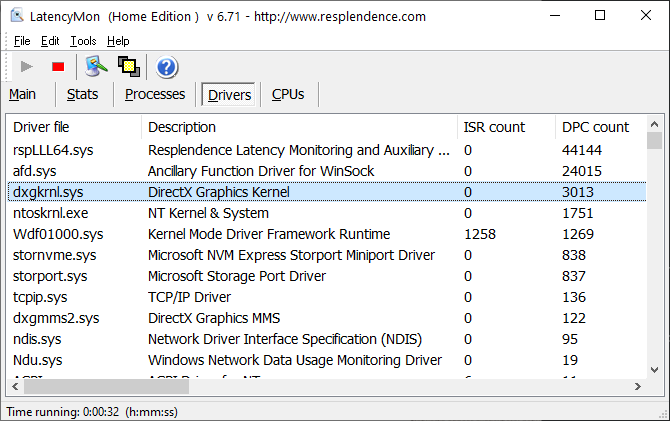
Drivers with a high DPC count potentially cause a high number of interruptions.
3. Disable Internal Devices
Rather than randomly updating drivers, start with disabling individual device drivers to find the culprit. If you already identified potential offenders, disable those first.
Go to the Start Menu, search for and open the Device Manager (also found in the Control Panel), expand the peripherals listed below, right-click a device, and select Disable.
Do this for one device at a time, check the CPU usage of system interrupts or re-run DPC Latency Checker, then right-click the device and select Enable before moving on to the next device.
These devices are the most likely culprits:
-
Network adapters
-
Internal modems
-
Internal sound devices
-
Any add-on cards, like a TV tuner card, ISDN or DSL adapters, or modems
If none of these are to blame, you can proceed with disabling (and re-enabling) other non-essential drivers.
Never disable any drivers necessary to run your system, including anything listed under Computer, Processors, and System device.
Also, don't try to disable the display adapters, the disk drive that runs your system, IDE controllers, your keyboard or mouse (unless you have an alternative input device, such as a touchpad), or your monitor.
4. Exclude Failing Hardware
If a corrupt driver can cause system interruptions, so can failing hardware. In that case, updating your drivers won't solve the issue. But if disabling the entire device fixed it, you should follow our guide to test your PC for failing hardware.
Note: System interrupts could also be caused by a faulty power supply or laptop charger. Try to replace or unplug that, too.
5. Disable Sound Effects
If you're on Windows 7, this may be the solution you're looking for.
Right-click the speaker icon in your system tray, select Playback devices, double-click your Default Device (speaker) to open Properties, head to the Enhancements tab, and Disable all sound effects. Confirm with OK and check how system interrupts are doing now.
6. Update Your BIOS
The BIOS is the first piece of software your system runs when you turn on your computer. It helps your operating system to boot. First, identify your BIOS version and check the manufacturer's website for updates and installation instructions.
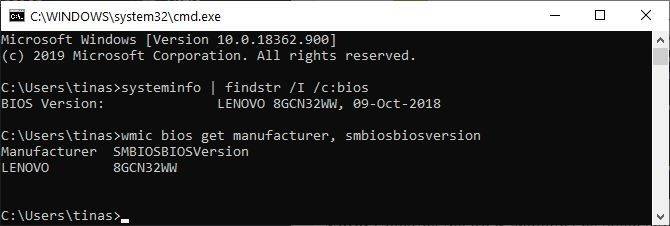
To find out your BIOS version, press Windows key + R, type cmd, hit Enter, and execute the following two commands, one after the other:
1. systeminfo | findstr /I /c:bios
2. wmic bios get manufacturer, smbiosbiosversion
Note that the I in /I is a capital i, not a lower case L.
Note: Updating the BIOS shouldn't be taken lightly. Make sure to back up your system first.


 Ren Ecosystem